Get set up in an afternoon
The setup checklist for a new company — sign in with Google, add your work location, add and invite employees, see the first clock-in, then prepare payroll and your HR team.
In one afternoon your company can be running on Logixbase HRIS: work location ready, employees invited, the first clock-in recorded, and salary data ready for your first pay period. This page follows the order of the Panduan Setup (Setup guide) on the Dashboard, so you always know what comes next.
Before you start
- A Google account for yourself — regular Gmail or your company's Google Workspace.
- Your employee list: names, each person's Google account email, job titles, and start dates. Base salaries can come later.
- The address of your work location: outlet, warehouse, or office.
- One employee's phone (or your own) to try the first clock-in.
Lots of data in Excel?
Our team can process a full migration — brands, locations, shifts, and pay — for you. See implementation help.
The setup guide on your Dashboard
A new workspace shows a Siapkan HRIS Anda (Set up your HRIS) card on the Dashboard: five steps from Workspace dibuat (Workspace created) and Tambah karyawan pertama (Add your first employee) (2) through Atur gaji pokok (Set base salary), plus Atur jadwal (opsional) (Set schedule, optional). The next step is always highlighted, every row opens the right page, and the card disappears by itself once everything is done.
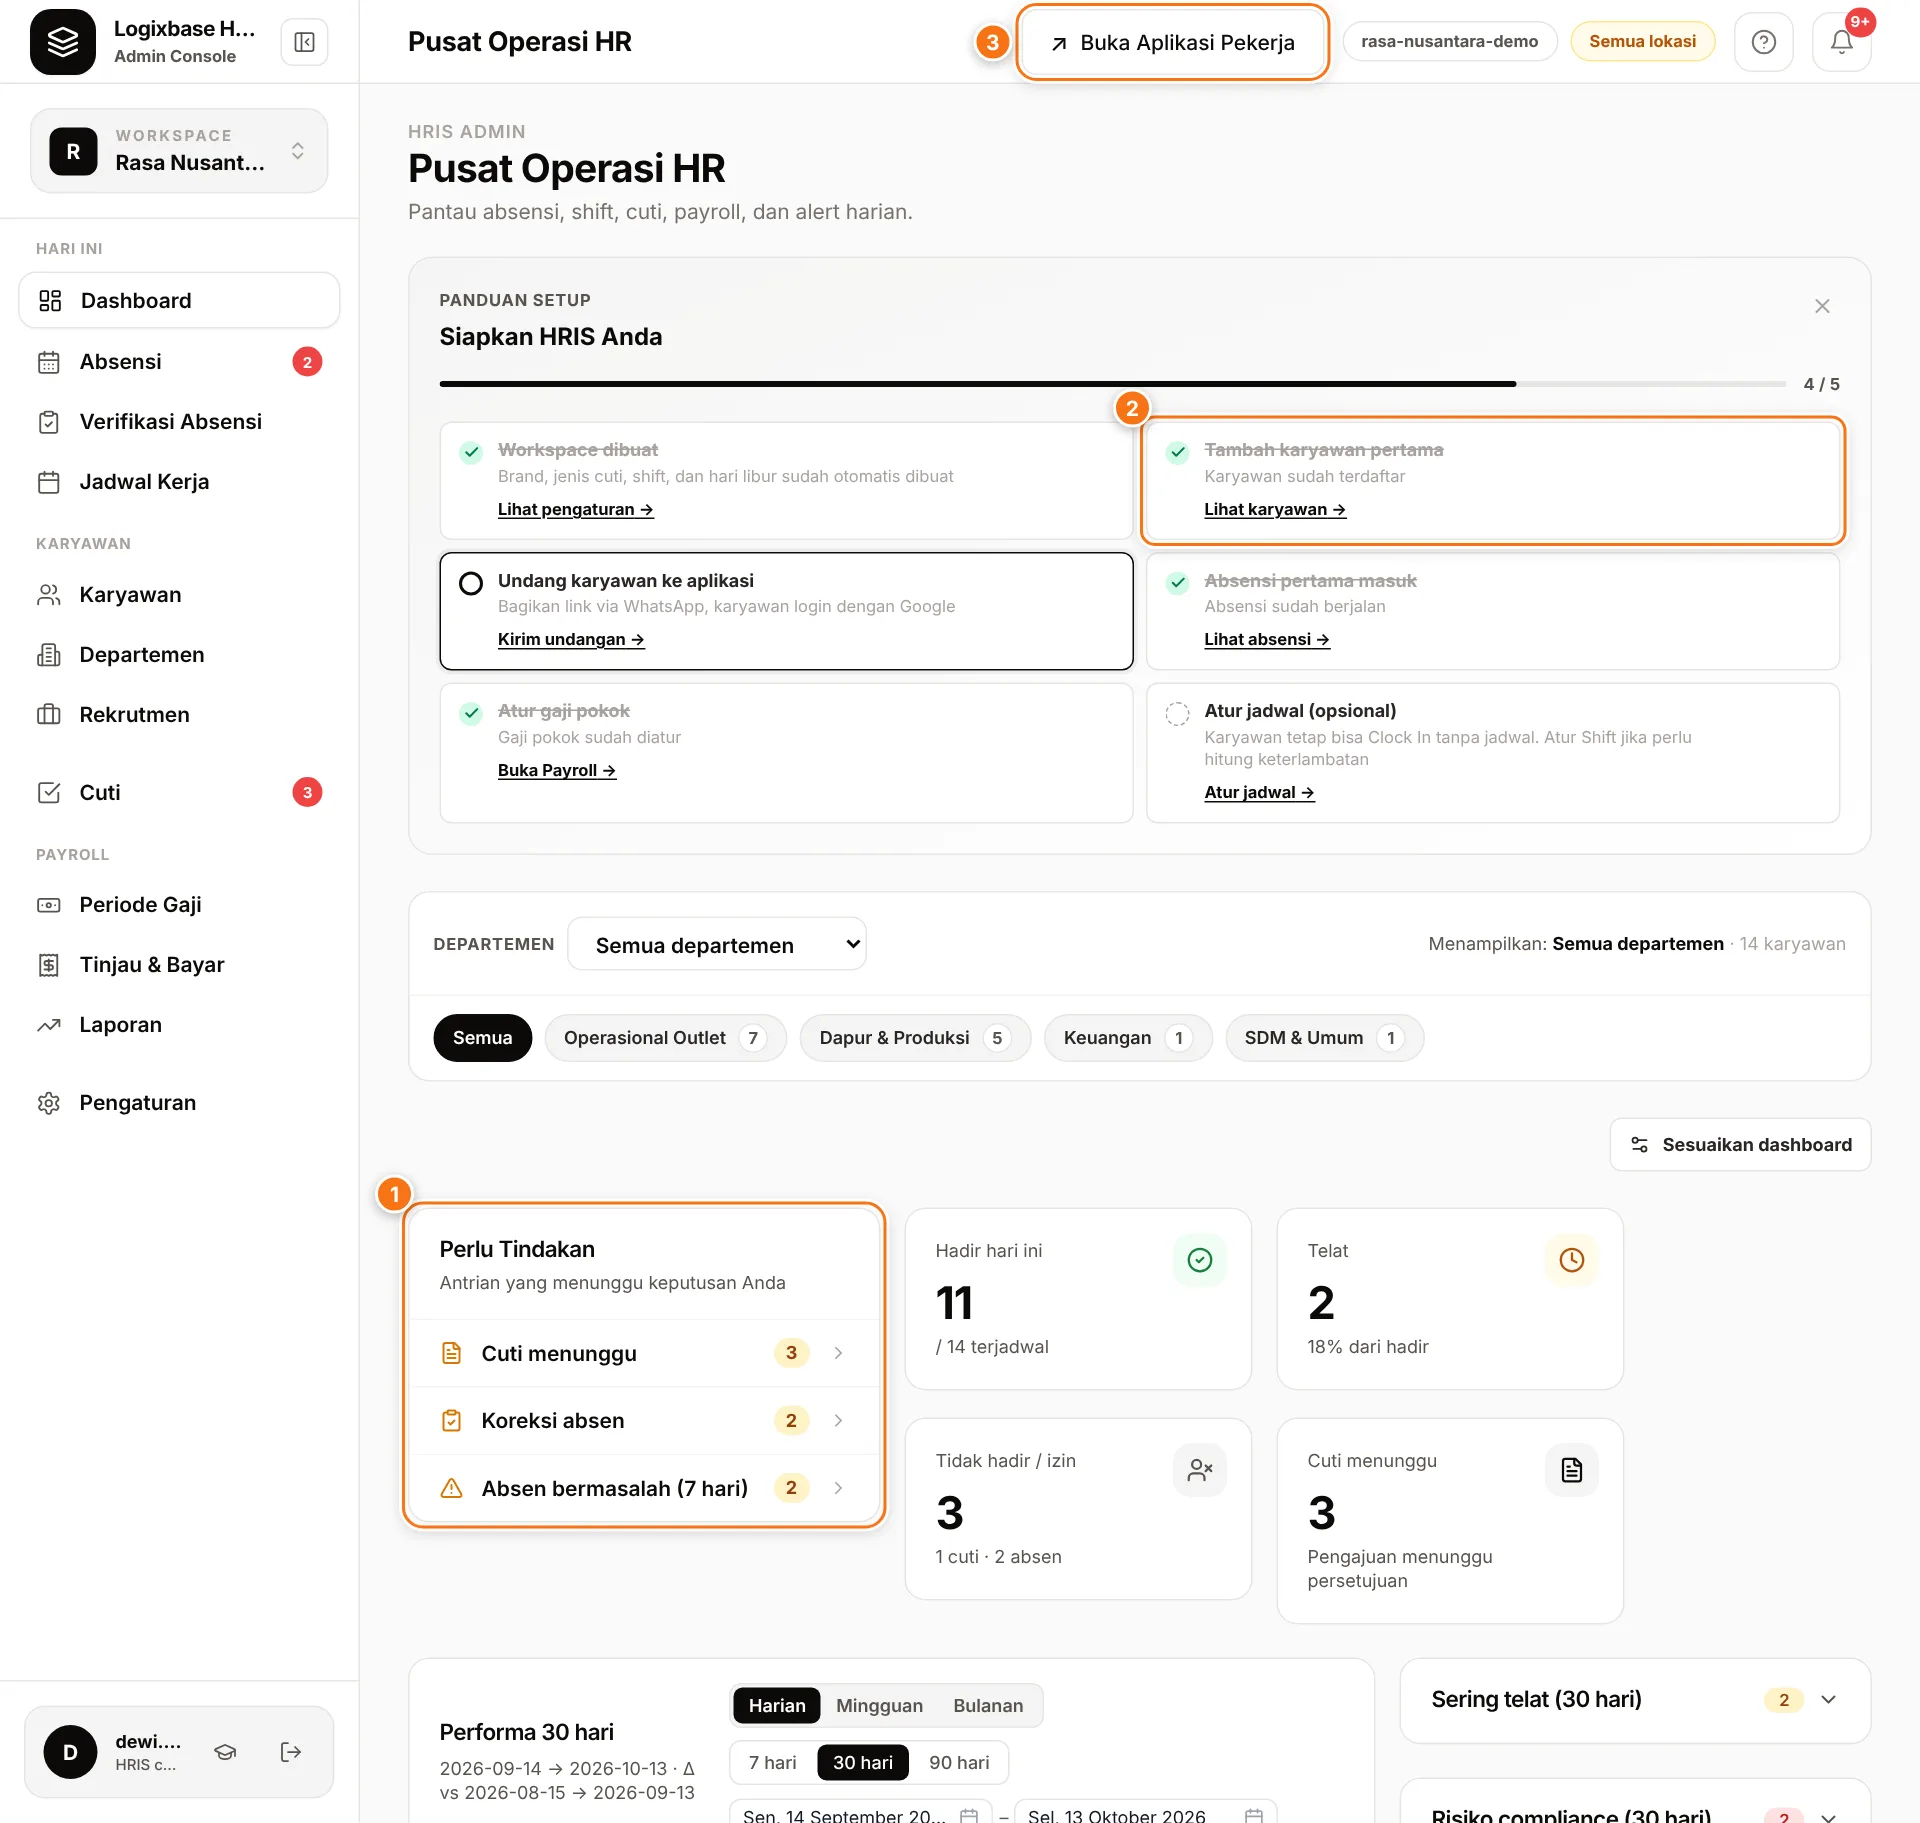
From the moment your workspace exists, it already has one brand named after your company, four leave types (Cuti Tahunan, Cuti Sakit, Cuti Melahirkan, Cuti Ayah — annual, sick, maternity, and paternity leave), one shift Shift Reguler from 09:00 to 18:00, and the national holiday calendar. You only adjust what you need.
Part 1 — Set up your workspace
- Get access and sign in. If self-serve sign-up is available, open the Mulai gratis (Start free) page at hris.logixbase.com/signup, click Lanjut dengan Google (Continue with Google), enter your Nama Perusahaan (Company name), and click Buat Workspace (Create workspace). If it is not available yet, contact our team: we prepare the workspace and send you an invite link, where you click Masuk dengan Google untuk menerima (Sign in with Google to accept). Why: signing in with Google means no new password to forget or leak.
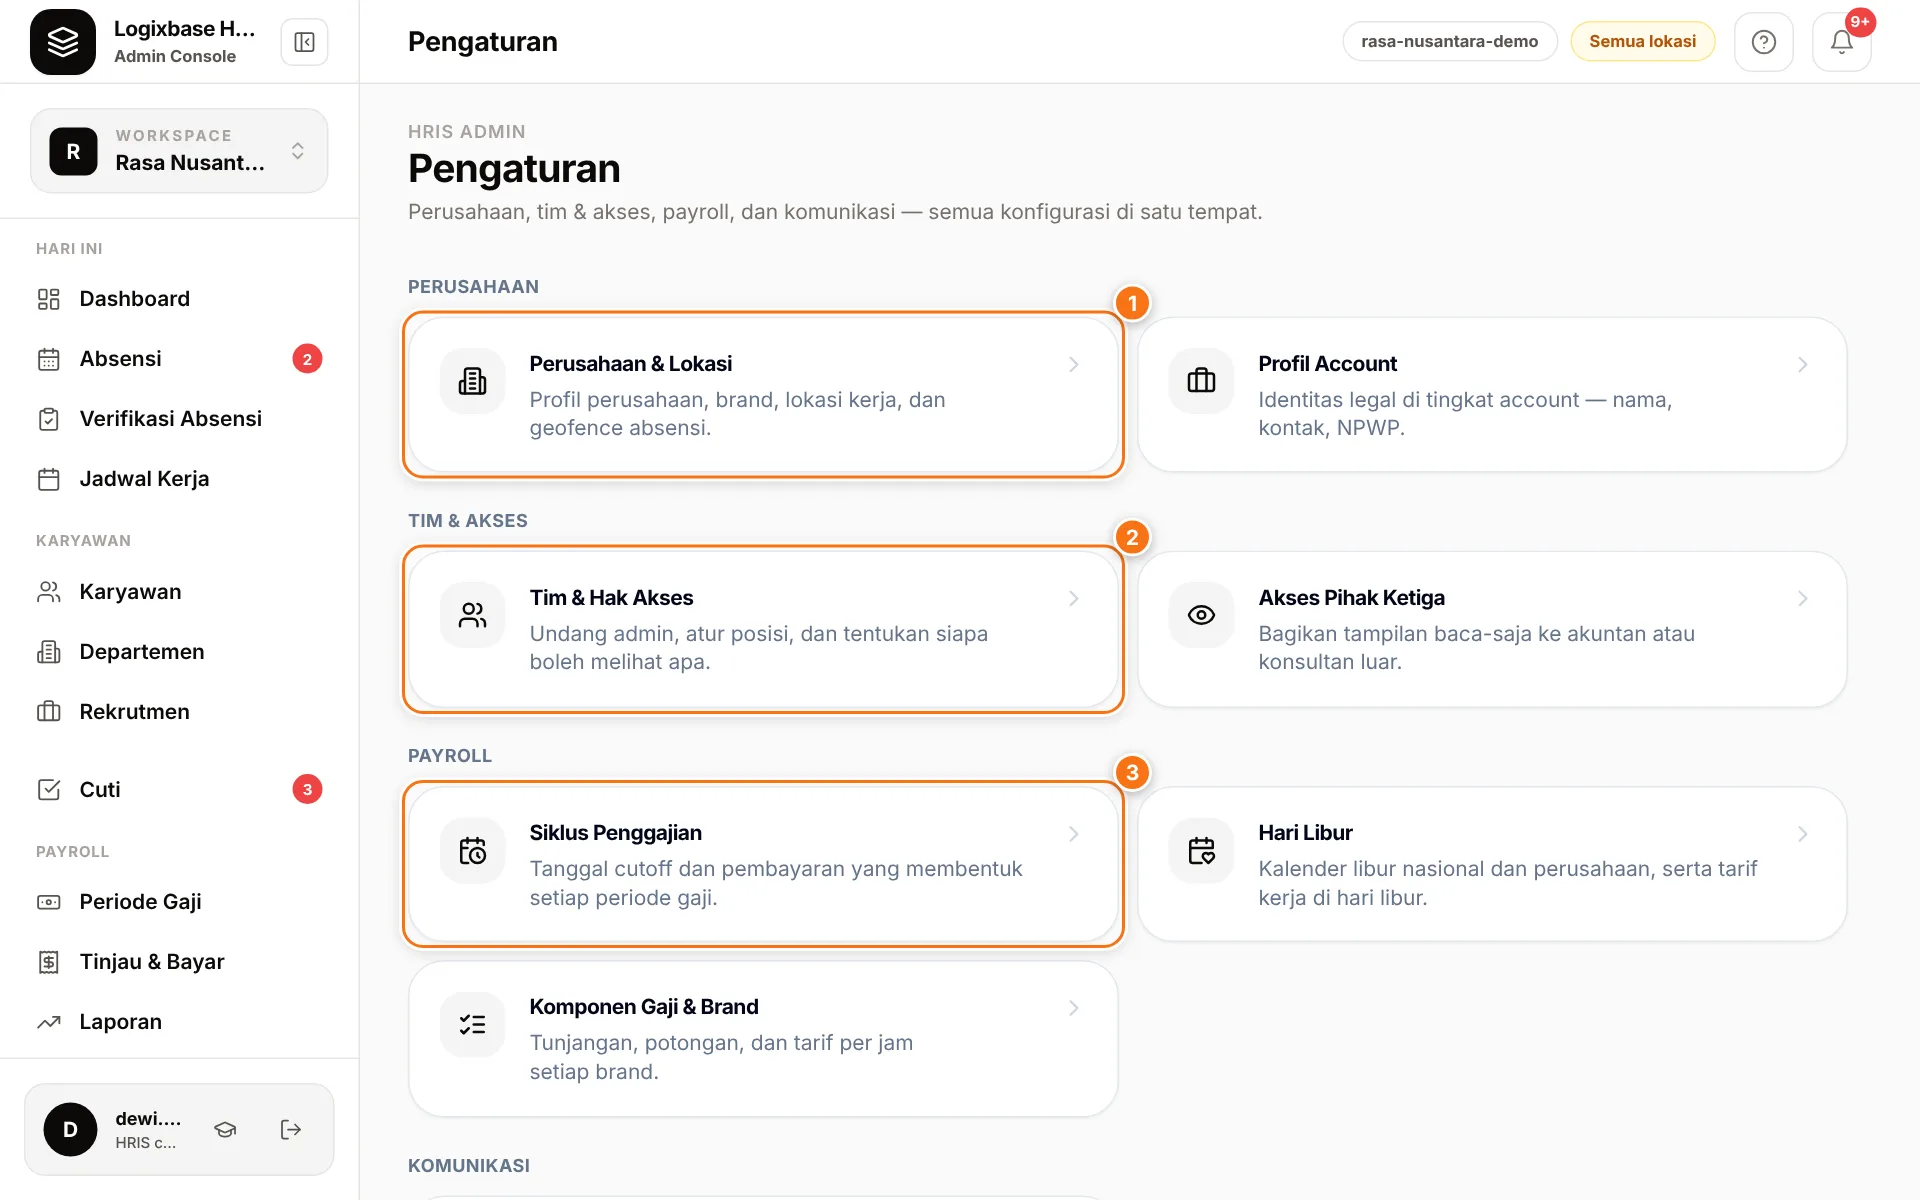
- Complete your company profile. Go to Pengaturan › Perusahaan & Lokasi (Settings › Company & locations) (1), click Edit Company, fill in the address, city, NPWP (tax ID), and logo, then click Simpan Company (Save company). Why: your company logo appears as the letterhead on payslips.
- Add your first work location. On the same page, click Tambah Lokasi Kerja (Add work location), search for the address or click the map to drop a pin, enter a radius in meters (default 100), then click Simpan Lokasi (Save location). Why: every clock-in is compared with this point — clock-ins outside the radius are still accepted, but flagged for HR. Details: Work locations & geofence.
- Let schedules wait. Absen tanpa jadwal (Clock in without a schedule) is on from the start, so employees can clock in before any shift exists. Why: you can start today and set up shifts later, when you need lateness tracking. Details: Shifts & schedules.
Part 2 — Get employees into the app
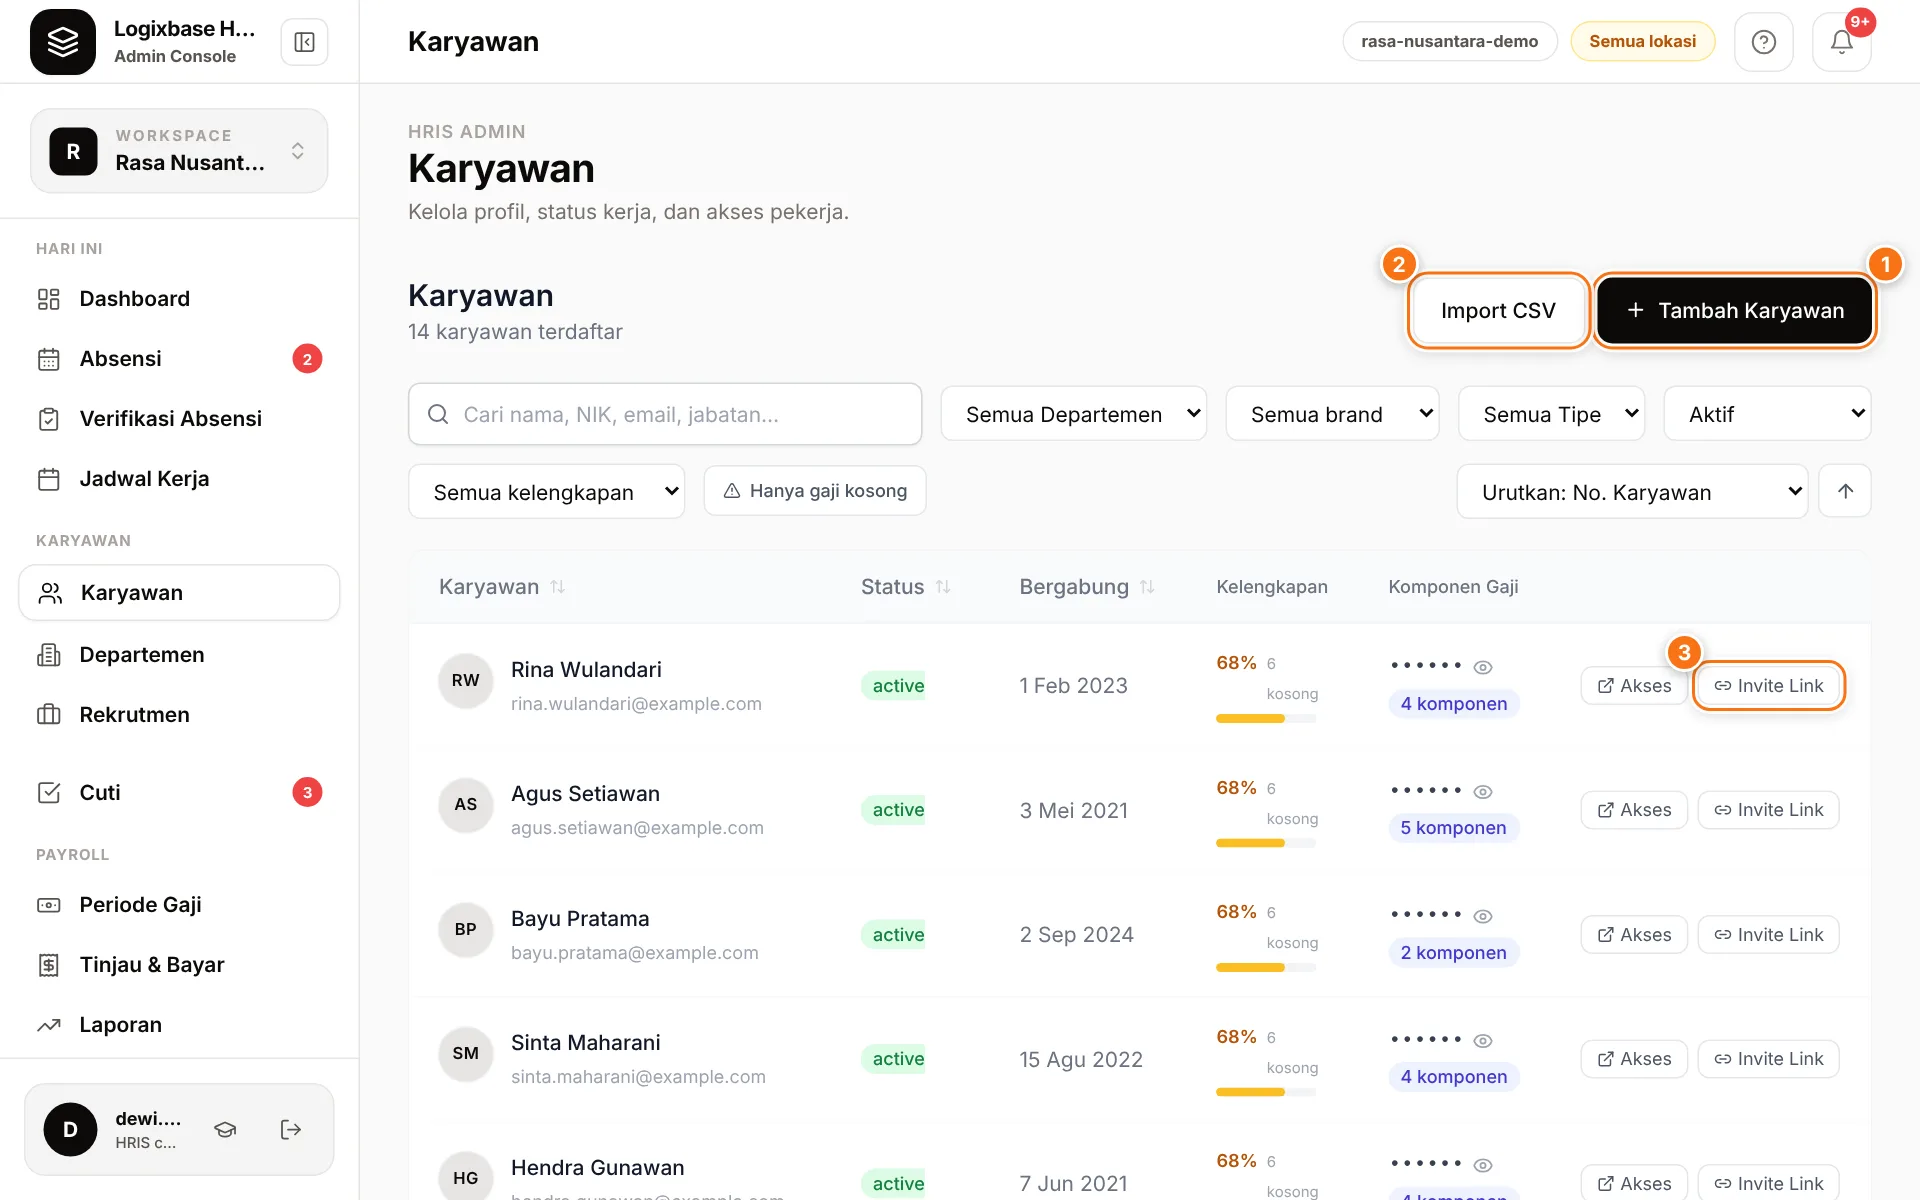
- Add employees. Open Karyawan (Employees) and click Tambah Karyawan (Add employee) (1). Only first name, email, brand, job title, employment type, and start date are required; everything else can be completed later. Click Simpan Karyawan (Save employee). Many employees at once? Use Import CSV (2). Why: this email is what the employee signs in with, so use the Google account email that is on their phone. Details: Manage employees.
- Send the invite. After saving, click Kirim undangan akun (Send account invite) — or, from the employee list, click Invite Link (3). In the Bagikan undangan (Share invite) window, click Salin pesan (Copy message) (1) and paste it into a WhatsApp chat with the employee. Why: the app does not send emails; you share the link over the channel your employees actually read. The link is valid for 7 days. Details: Invite employees.
- Welcome the first clock-in. The employee opens the link, signs in with Google, taps Clock In Sekarang (Clock in now), and takes a selfie. The clock-in appears right away in Absensi (Attendance) and on the Dashboard. Why: this is the sign that the system is really running, and the Absensi pertama masuk (First clock-in received) step on the checklist is ticked.
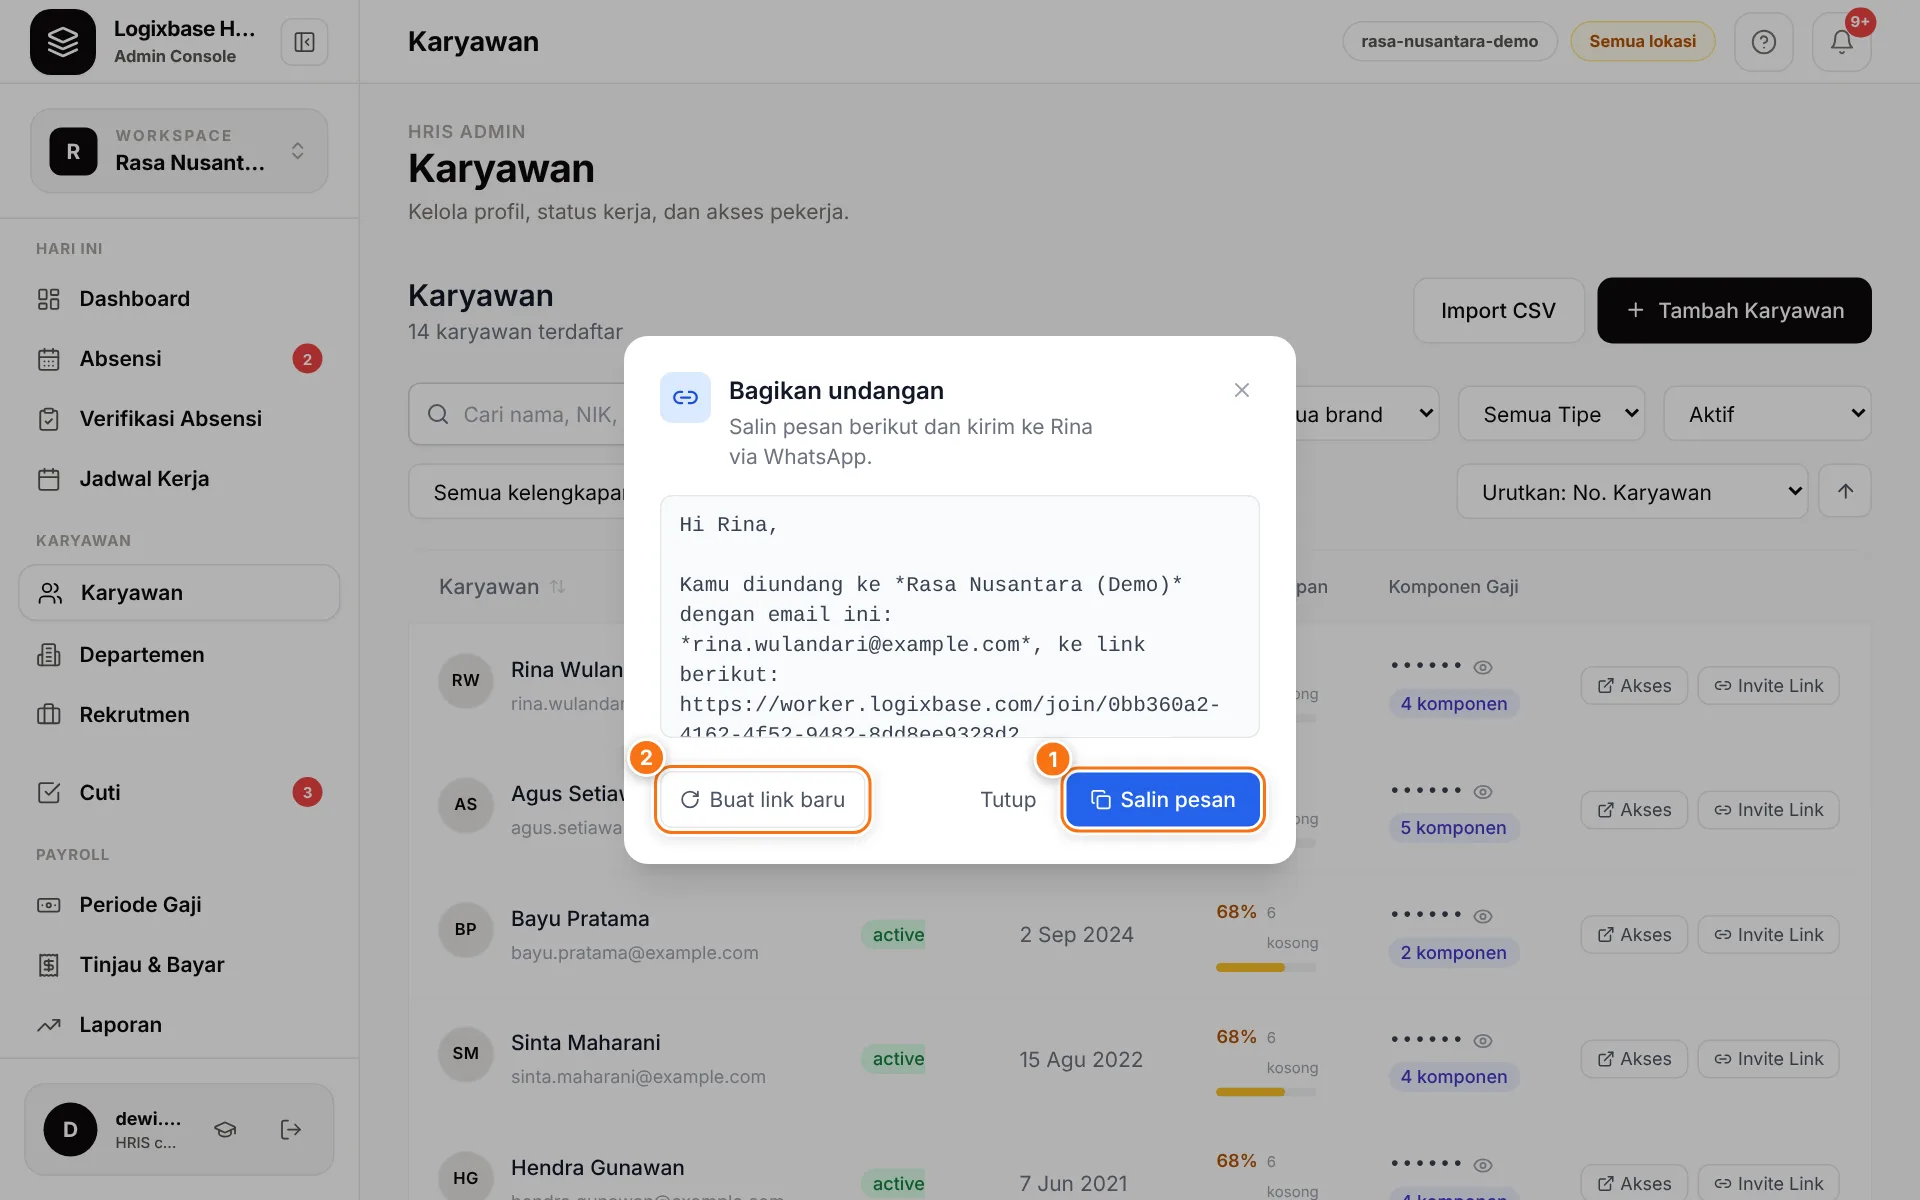
Link older than 7 days? Open that employee's Invite Link again and click Buat link baru (Create new link) (2). The old link stops working automatically.
Try it yourself first
Add yourself as an employee with your own Google email, then click Buka Aplikasi Pekerja (Open employee app) on the Dashboard. You will go through exactly the same clock-in flow as your employees before you explain it to the team.
Part 3 — Ready for payroll and your team
- Set base salaries. Open each employee's profile, go to the Penggajian (Payroll) section, and fill in Gaji Pokok (Base salary). Why: payroll needs it before it can run; the Atur gaji pokok step on the checklist is ticked as soon as one employee has a base salary. Employees with salary type Per Jam (Hourly) are paid from brand hourly rates — see Staff across brands and outlets.
- Set your payroll cycle. Go to Pengaturan › Siklus Penggajian (Settings › Payroll cycle) (3) and set your monthly cutoff date — a new workspace starts with Buat aturan (Create rule). The full steps, including creating pay periods, are in Set up payroll. Why: the cutoff date decides which attendance each pay period covers.
- Invite your HR, managers, and finance. Go to Pengaturan › Tim & Hak Akses (Settings › Team & access) (2), click Undang Anggota (Invite member), enter the email and role, click Buat Link Undangan (Create invite link), then Salin pesan and send it. A manager must be given a department. Why: everyone sees only what they need — managers, for example, do not see salaries. Details: Team & access.
What you should see
- Employees who accepted their invite can clock in, and their attendance shows in Absensi and in the Hadir hari ini (Present today) card on the Dashboard.
- The Siapkan HRIS Anda card disappears once all five steps are done.
- Your first pay period is ready to create in Periode Gaji (Pay periods).
What to tell your employees
Three short messages for your team
Send the invite message together with these three points: (1) open the link — or go straight to worker.logixbase.com while the invite is still valid — and sign in with the Google account whose email HR registered; (2) allow camera and location access when asked; (3) add the app to the home screen so it is easy to open. Share the quick guide for employees too.
Common problems
- An employee sees "Akses worker belum tersedia" (Employee access not available yet). They signed in with a Google account whose email differs from the one registered. That screen has no sign-out button, so ask them to open the invite link again and sign in with the right Google account — see the employee sign-in guide if their phone uses several Google accounts. If the email you registered is wrong, fix it in their employee record and click Buat link baru.
- The sign-in page says "Email Anda belum terdaftar dalam undangan aktif" (Your email has no active invite). This account has not been invited to any workspace. Ask your company admin for an invite, or contact us if you are an owner without a workspace yet.
- The "Atur gaji pokok" step is not ticked. The checklist waits for at least one employee with a Gaji Pokok above zero.
Next steps
Rather not set up alone? Book a short session with our team — we will set up your locations, employees, and pay together with you.