Adding and managing employees
Add an employee with just six fields, complete what payroll needs, track data completeness, and handle status changes such as inactive, termination (PHK) or reactivation.
Attendance, leave and payroll only run for registered employees. Six fields are enough to start — fill in the rest over time; the app always shows what is still missing before payroll.
Before you start
- Sign in as Admin or HR Manager. A Manager only sees employees in their own department, without salary, bank account, NIK (national ID number) or NPWP (tax ID).
- Have each employee's Google account email ready — employees use it to sign in to the app.
- Create departments first if you want to pick them straight away.
The employee list
Open the Karyawan (Employees) menu. Tambah Karyawan (Add employee) (1) and Import CSV (2) are at the top right; Invite Link (3) appears on the row of anyone not yet connected to the app.
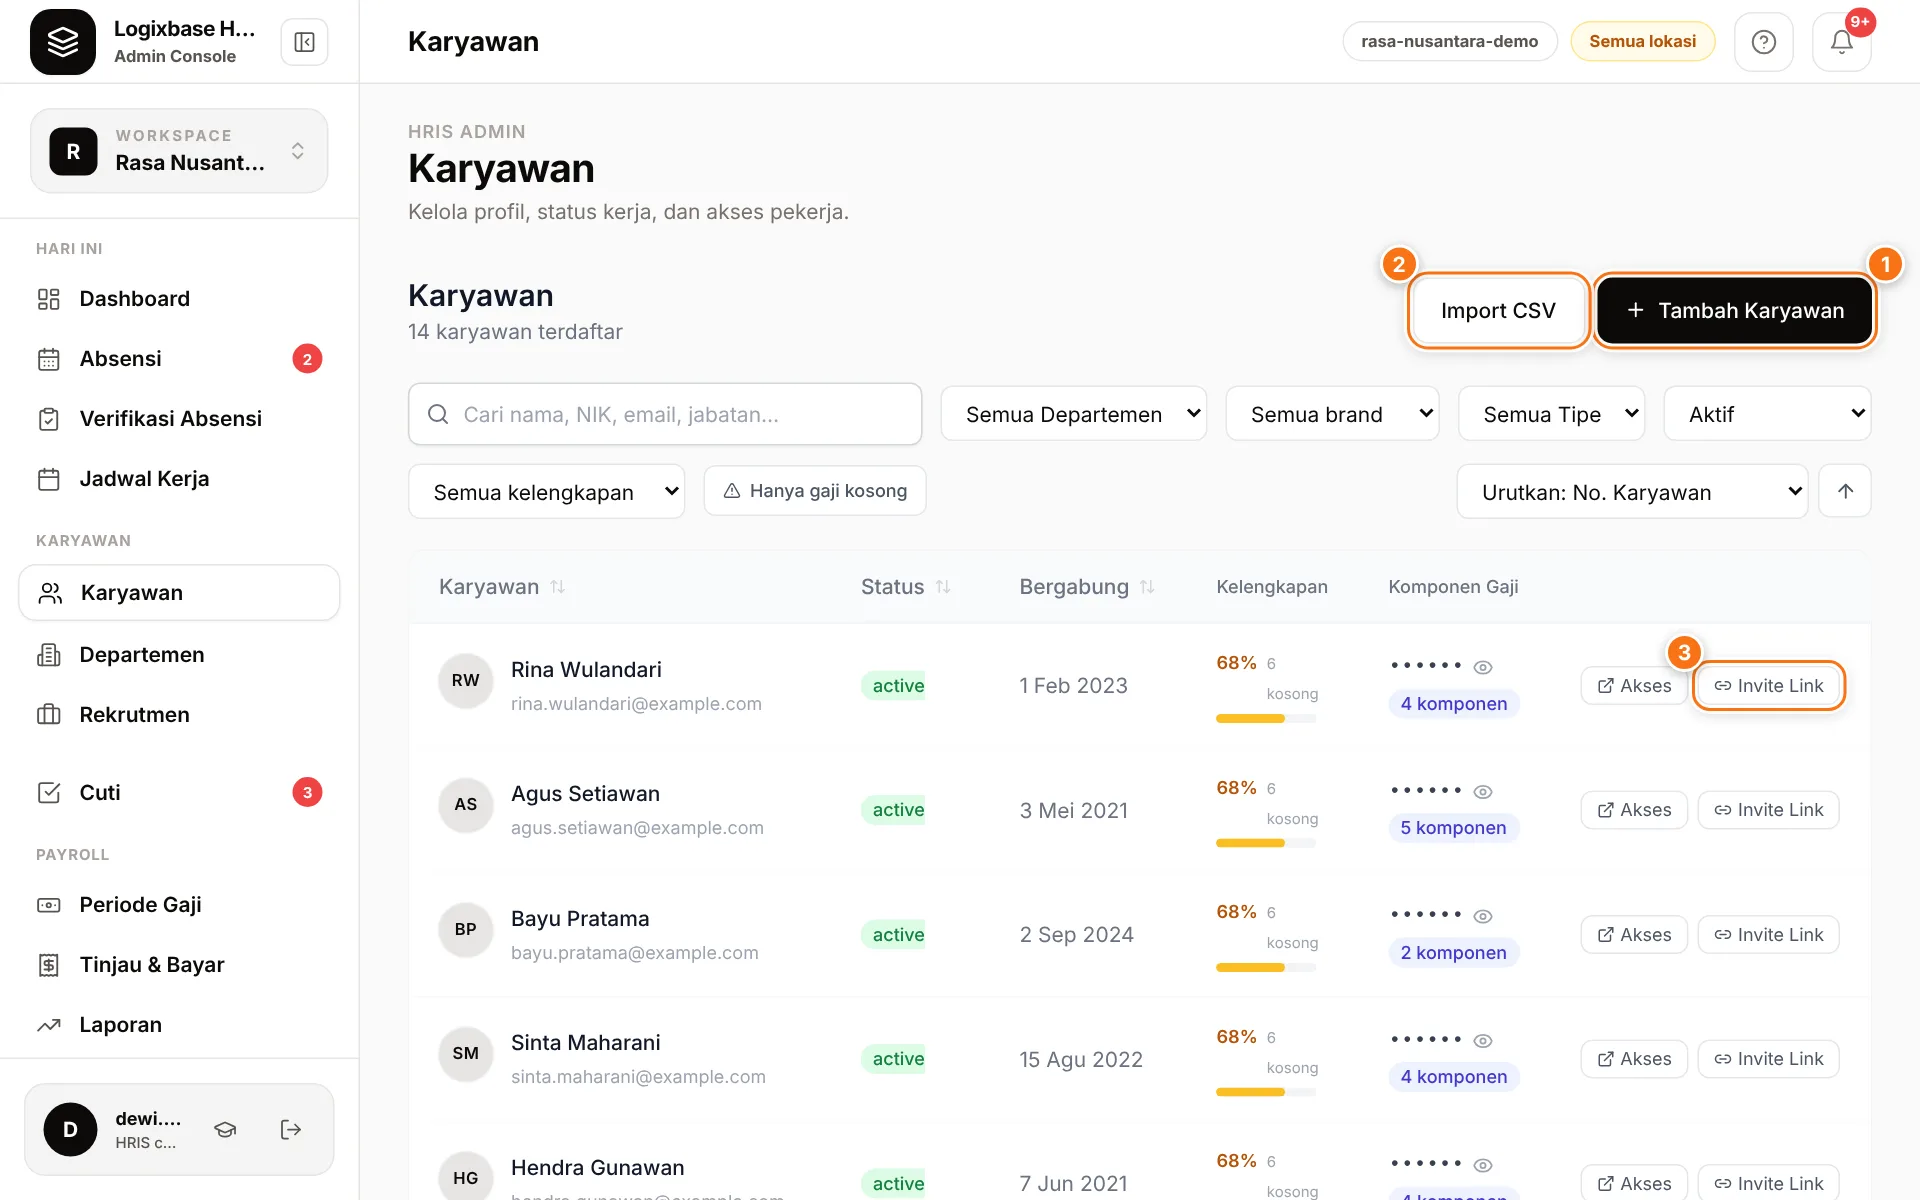
- Search by name, NIK, email or job title; filter by department, brand, type and status. Status defaults to Aktif (active) — pick Semua status (all) to see Nonaktif (inactive), Resign (resigned) or Diberhentikan (terminated) employees.
- The Kelengkapan Data (data completeness) filter offers Data belum lengkap (incomplete), Gaji belum diatur (no salary set), BPJS belum terdaftar (no BPJS) and Belum punya akun (no app account yet).
- The Kelengkapan column shows the share of required data filled in. Click it, or a badge such as Gaji belum diisi (salary missing), to jump to the section that needs work.
- Department, job title, phone number and status can be edited right in the table.
The employee list cannot be exported yet; for summary figures, use Reports.
Adding an employee
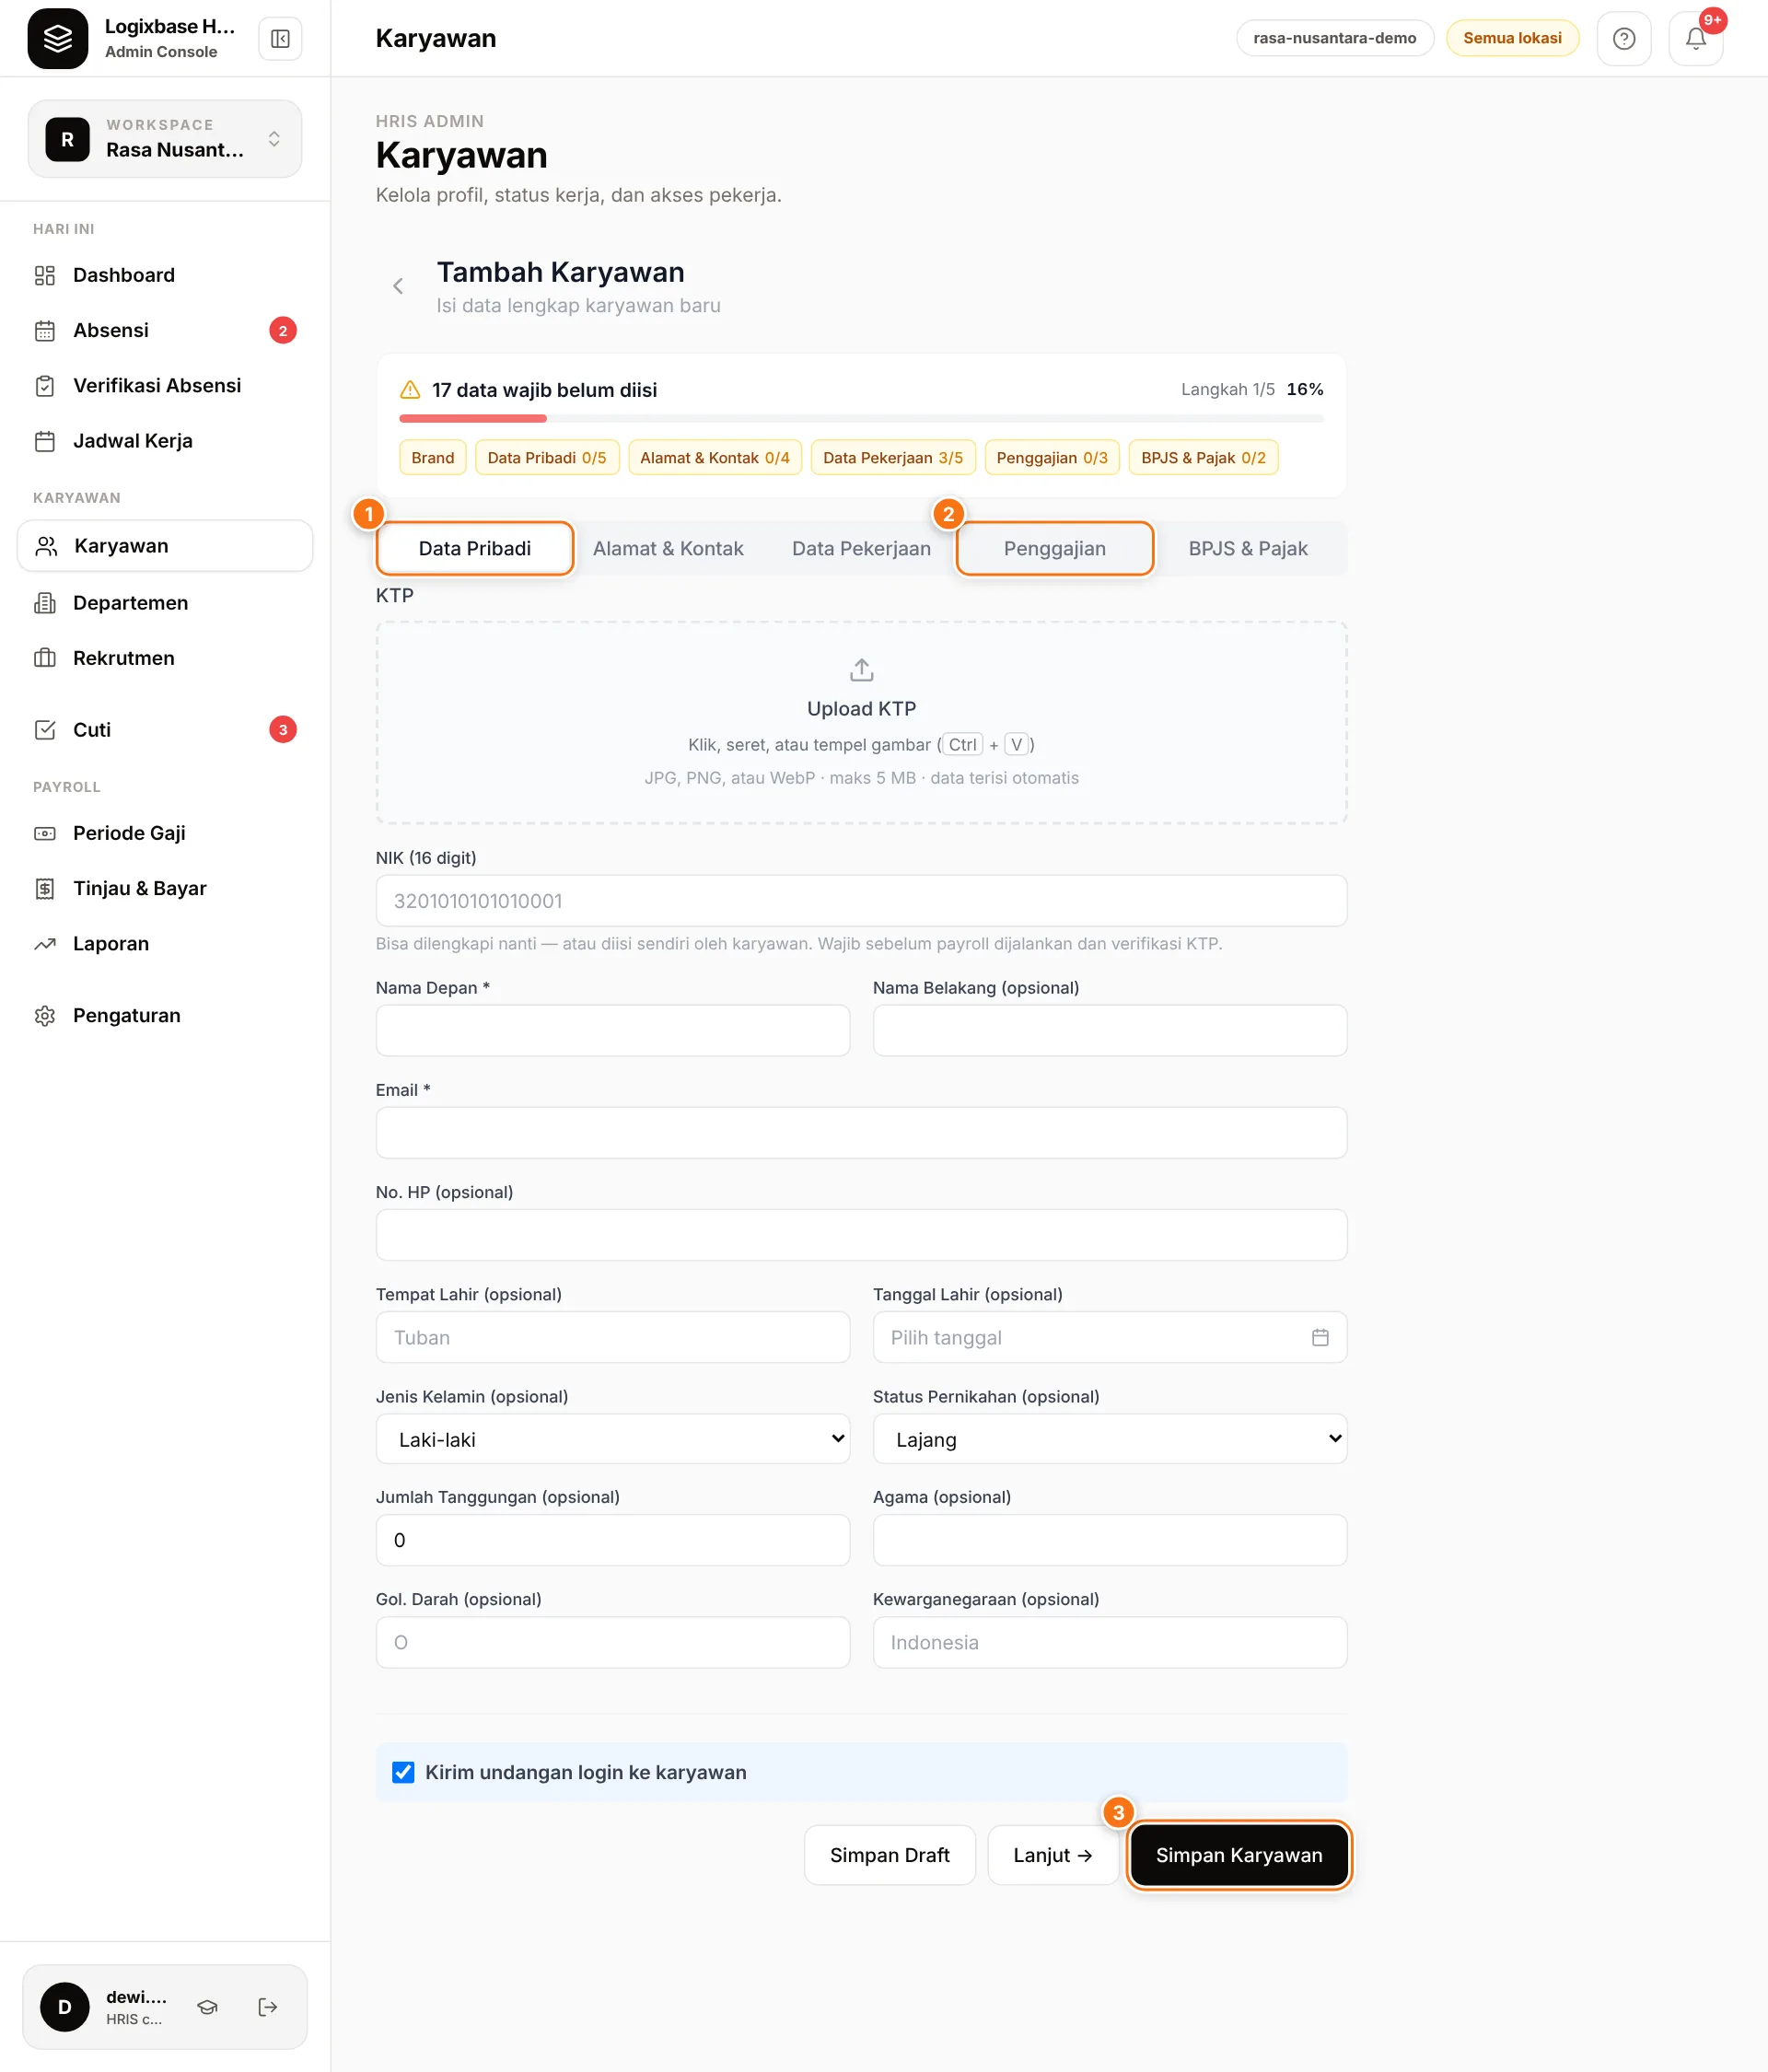
- On the Karyawan page, click Tambah Karyawan.
- On the Data Pribadi (personal data) tab (1), fill in Nama Depan (first name) and Email. NIK can wait; if entered, it must be 16 digits. You can Upload KTP (ID card) — if automatic ID reading is enabled, some fields fill themselves; double-check them.
- On the Data Pekerjaan (job data) tab, choose the Brand, then fill in Jabatan (job title), Tipe Kepegawaian (employment type) and Tanggal Bergabung (join date). Leave Nomor Karyawan (employee number) empty to have it generated.
- On the Penggajian (payroll) tab (2), choose the Tipe Gaji (salary type) and enter the amount and bank account. You can skip it now, but payroll needs it.
- Keep Kirim undangan login ke karyawan (send login invitation) ticked so the employee can clock in from their phone right away.
- Click Simpan Karyawan (save employee) (3). The button is on every tab; if a required field is empty, you are taken to that tab.
Once saved, you see Karyawan berhasil disimpan (employee saved) with a list of next steps. If the invitation was ticked, the Bagikan undangan (share invitation) window opens straight away — continue with Invite employees to the app.
Simpan Draft (save draft) only keeps your entries in this browser: nothing reaches the system and other admins cannot see it. Next time you open Tambah Karyawan, choose Lanjutkan draft (continue) or Buang (discard).
Minimum data vs. data before payroll
| When | Data |
|---|---|
| Required to save | First name, Email, Brand, Job title, Employment type, Join date |
| Before the first payroll | Salary type and amount, bank account, tax status (PTKP), NIK |
| When available | Address and emergency contact, BPJS numbers, NPWP, documents |
Bulanan (monthly) or Harian (daily) employees without a base salary are still included in payroll, but their base pay is Rp 0 and the payroll period flags them as tanpa gaji pokok (no base salary). Find them early with the Gaji belum diatur filter. Leave Metode PPh 21 (income tax method) on Gross, the default.
Salary types
| Tipe Gaji | What you enter | How it is paid |
|---|---|---|
| Bulanan (monthly) | Gaji Pokok (base salary) | A monthly salary; Kebijakan Gaji Bulanan (monthly salary policy) defaults to Tetap fixed, paid in full. |
| Harian (daily) | Upah Harian (daily wage) | Wage × days attended. |
| Per Jam (hourly) | Dasar BPJS & komponen % (BPJS and % base) | Pay follows the brand's hourly rate; this figure is only the base for BPJS and percentage components. |
Brand hourly rates live in Komponen Gaji & Brand; a special rate for one employee goes through Kelola Rate & Lembur (manage rates) in the Penggajian section of their profile. See payroll setup.
The employee profile
Click an employee's name to open their profile. The left menu holds Data Karyawan (Data Pribadi, Alamat & Kontak, Data Pekerjaan, Penggajian, BPJS & Pajak — the same sections as the form) and Lainnya: Ringkasan, Keluarga & Tanggungan, Brand / Task, Riwayat Gaji, Cuti & Izin, Kehadiran, Performa and Dokumen — summary, family, brands, pay history, leave, attendance, performance and documents.
Click any value to edit it in place; changes save automatically and are recorded in the audit log. Under Brand / Task, set which brands the employee may pick when clocking in — important for multi-brand businesses.
Buttons at the top of the profile:
- Surat Verifikasi (verification letter) opens a printable Surat Keterangan Kerja & Penghasilan (employment and income letter), for example for a loan application. It contains the NIK, salary and bank account — give it only to the employee concerned.
- Bagikan Undangan (share invitation) appears when the employee has not connected to the app yet.
- Pindahkan Brand (move brand) changes the employee's main brand; existing attendance and pay history stay as they are.
Inactive, termination (PHK) and reactivation
- Nonaktif (inactive) is a temporary pause, for example unpaid leave: in the employee list, click the value in the Status column and choose inactive. The employee cannot clock in, but their leave requests are kept.
- PHK (termination, Admin only): on the profile, click PHK, fill in Tanggal Efektif (effective date) and Alasan PHK (reason), then Konfirmasi PHK. Pending leave is cancelled and the employee's app access is closed; attendance and pay history are kept. Their final payslip is calculated in the period the Tanggal Efektif falls in, with base salary up to that date.
- Aktifkan Kembali (reactivate) appears on the profile of anyone not active. The status returns to active, termination details are cleared, this year's leave entitlement is adjusted, and sign-in works again if the employee was invited before.
Departments
Departments shape your org structure and define a Manager's scope.
- Open Departemen (Departments) under the Karyawan menu and click Tambah (add), or + Tambah Departemen while the list is empty.
- Enter the Nama Departemen (name). The Kode (code, up to 10 capital letters) is optional but handy for bulk import. Pick a Departemen Induk (parent) for a sub-department.
- Click Simpan (save).
Switch between the Daftar (list) and Struktur (org chart) views; in Struktur, tap a department to see and add its members. Kepala Departemen (department head) and Approver Cadangan Cuti (backup leave approver) only take effect with the advanced leave policy — an optional feature, contact us to enable it. Only an Admin can delete a department.
Common problems
- "Email sudah terdaftar di organisasi ini", "NIK sudah terdaftar di organisasi ini" or "Nomor karyawan … sudah digunakan di organisasi ini" (already registered or used): all three must be unique within one company, including inactive or terminated employees and other brands. Click Buka detail karyawan → (open details); if it is the same person, use Aktifkan Kembali.
- An employee is missing from the list: check the status filter (defaults to Aktif) and the brand filter.